flatcar installation
8 minute read
Introduction
Welcome to the United Manufacturing Hub Stack installation guide. In this guide, we will walk you through the process of installing the stack on an edge device. This process is divided into three parts: first, the installation of Flatcar, followed by the setup of the stack within UMHLens. Please note that while the accompanying videos may be helpful, some of the information may be outdated. Refer to the text on this page as well as the description of the youtube videos to verify if the information is still up to date. Make sure you have the necessary hardware and prerequisites before beginning the installation.
If you encounter any issues, feel free to check out the troubleshooting section at the bottom of this article
Hardware requirements
minimal:
- 2 cores CPU
- 4 GB RAM
- 256 GB SSD
recommended:
- 4 cores CPU
- 8 GB RAM
- 256 GB SSD
Installation
Depending on your situation you might want to deviate from the guide to do some adjustment but for your first installation it is recommended that you stick to it!
Prerequisites
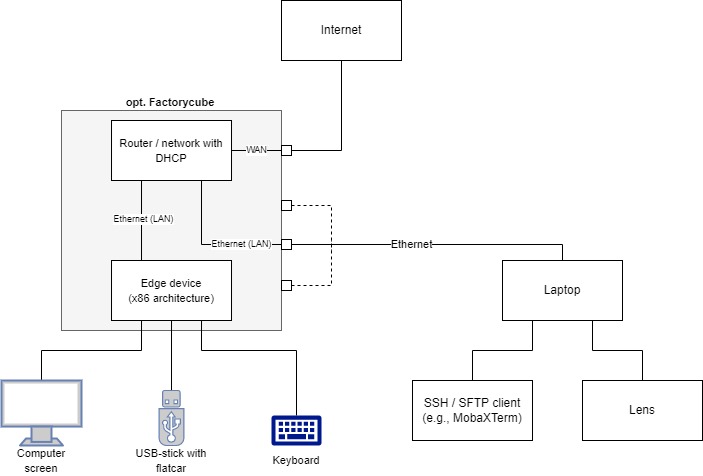
As you can see in the illustration, there are some prerequisites for the installation.
The following things are required:
an edge device with x86 architecture, we recommend the K300 from OnLogic .
the latest version of our iPXE image
- If you are unsure, which version to pick:
- ipxe-x86_64-efi for reasonable modern systems (AMD/Intel)
- ipxe-x86_64-bios
- ipxe-arm64-efi for ARM based devices (e.g. Apple)
- If you are unsure, which version to pick:
a computer with an SSH/SHTP client (we recommend MobaXTerm if you are using Windows (or since Windows 11, the built-in terminal) or inbuilt Linux commands if you are using a Linux OS) and UMHLens installed. We recommend a laptop with an Ethernet port or an Ethernet adapter.
local LAN (with DHCP) available via at least two Ethernet cables and access to the internet.
a computer monitor connected with the edge device
a keyboard connected with the edge device
Video Guide
This is a step-by-step video, which will chaperone you through the first steps of the installation
If video guide is not your thing we also have a text based guide right below to help you with the setup!
Text Guide
Step 1: Installing flatcar on the edge device
Insert your USB flash drive with a flashed image of flatcar into your device
Boot from the USB flash device. To do this you need to go into the boot menu of the edge device.
How to do this is different for every hardware and is described in your hardware manual.
If you currently don’t have your hardware manual, you can test for the boot menu button by repeatedly pressing the F1-F12 keys during the boot process of the computer (right after you press the power button) as these buttons are frequently the boot menu buttons. Alternatively you can try the same with the “delete button”.
Then select your USB flash device to boot from.
Accept the License
Select the correct networking setup for your setup
- In most cases DHCP will work
Wait for network to be acquired
Select which disk type (SDA, HDA, VDA, NVMe, or custom) you want to install on. If you have no idea what to select, you have three choices:
- Boot up anything else on the machine and type in
lsblk(for Linux) to see whether it is sda, vda, etc. - Look it up in the device manual whether it is a SCSI disk (sda), a virtual machine (vda), a NVME disk (nvme0)
- Try out randomly. When you do this, it can happen that you install it on the usb-stick instead, which then requires re-flashing. So you might need to bring some patience with you.
- Boot up anything else on the machine and type in
The installation will now begin and the device will reboot a couple of times. The installation is finished, when it asks you to login into “core@flatcar-1-umh-xxxx:”. If it says “core@flatcar-0-install-xxxx”, then the flatcar installation OS is still running. For a better overview over the process, you could check out our blog article

This is how it should look like after the installation was successfully and you logged in using the credentials core and as password umh
Step 2: Connecting with the Edge PC via SSH authentication
Now we use the other PC device, presumably a laptop, to connect to the Edge PC via SSH authentication. This has the advantage that we can access the Edge PC without the need to plugin a keyboard or a monitor. For this installation guide we assume you are using windows as your operating system.
Open MobaXTerm on your device. You can get MobaXTerm for free from their https://mobaxterm.mobatek.net/download.html
Open a new Session by clicking on “Session” in the upper left corner
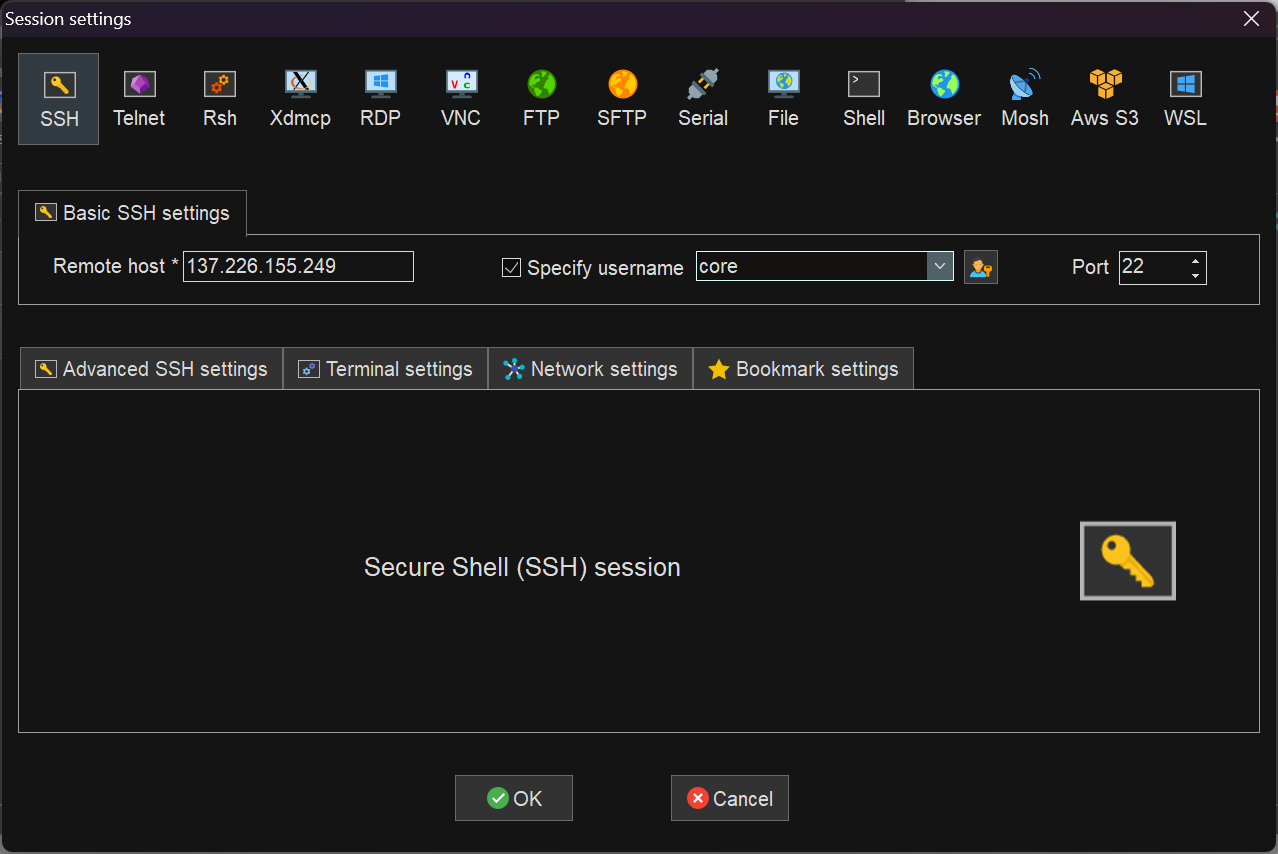
Select SSH on the upper part of the new window and type in the IP address of the edge PC in the field “Remote Host”. Check the Box next to “specify Username” and type in
corein the field next to it.Press OK to start the connection
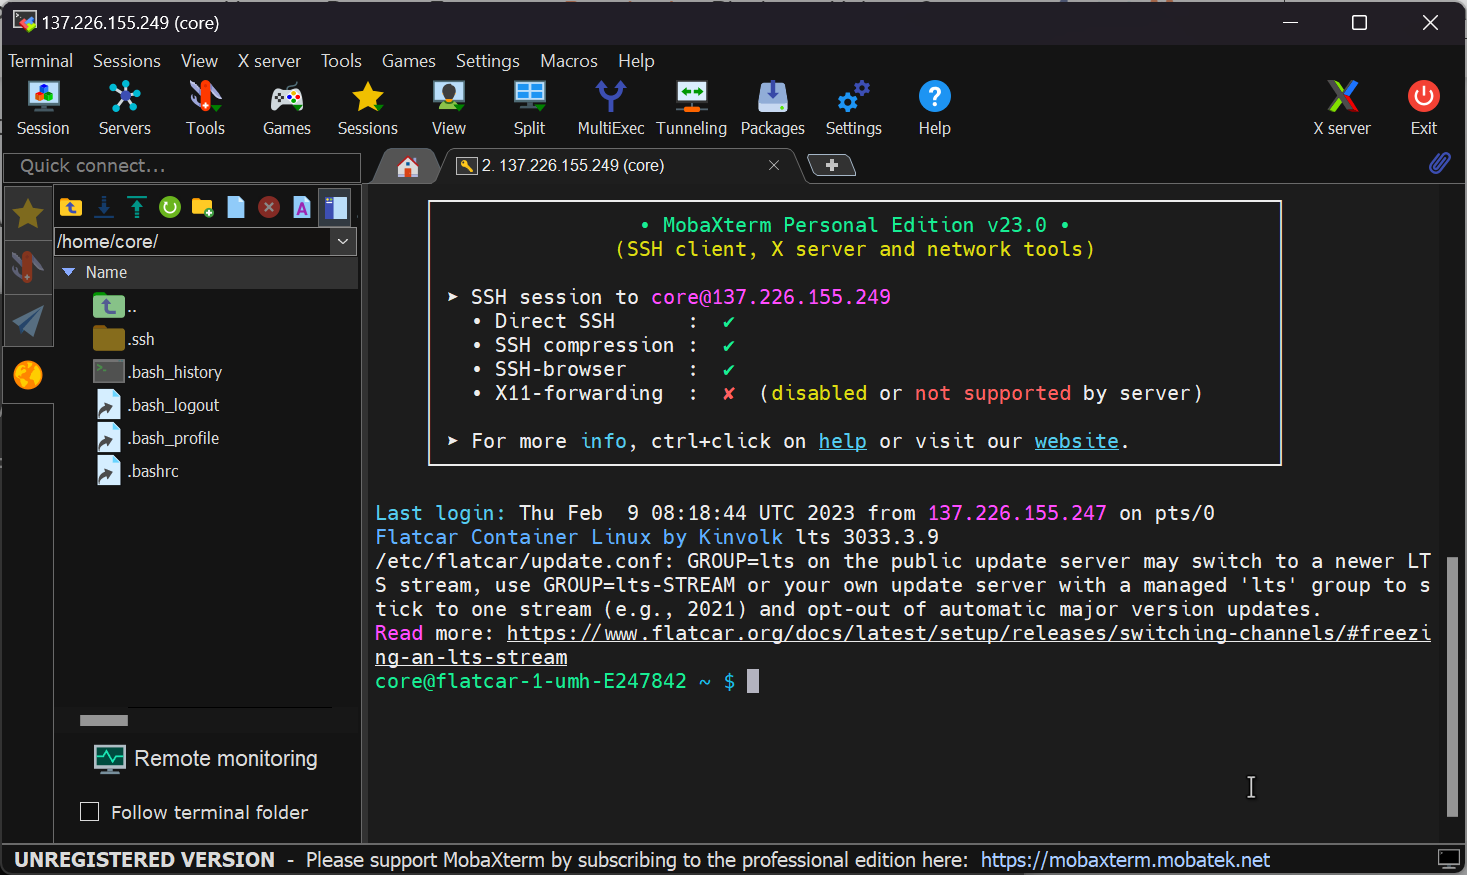
When connecting to the Edge PC it should ask for a password. The default password is
umh. Type it in and press Enter.You are now successfully logged in via SSH and the interface should look like in the picture below.
Step 3: Getting Kubernetes credentials and setting up UMHLens
Open UMHLens on your device. You can get UMHLens for free from this GitHub Repository .
Click the three horizontal lines in the upper left corner and choose files → preferences
Click on Kubernetes and select “Add custom repo”, type in
https://repo.umh.appas the URL and decide on a name for the repository.Execute
sudo cat /etc/rancher/k3s/k3s.yamlin your SSH session on your laptop (e.g. in MobaXTerm) to retrieve the Kubernetes credentials. Copy the content of the result into your clipboard with Ctrl + C.Click File and then Add Cluster.
Paste the clipboard into the kubeconfig prompt of UMHLens.
Change the IP Address in the kubeconfig to the IP address of the Edge PC. the port (the last 4 numbers after the colon) needs to stay unchanged.
Click on Add Cluster.
Click on the Cluster to connect to it.
Write
helm repo add united-manufacturing-hub https://repo.umh.app/into the terminal of the UMHLens Cluster.Write
helm repo updateto update.Fully close the UMHLens App and start UMHLens again.
Click on Browse Clusters in Catalog, then connect to the Cluster.
Click on Helm -> Releases and change the namespace from default to united-manufacturing-hub in the upper right corner

Click on the Release
united-manufacturing-hubto be able to inspect the values.yaml file, which holds the configurations of all microservices used in the cluster.Make sure the
iprangeinsensorconnectof the values.yaml is set to be in the same subnet (first 3 numbers of the IP range) as the edge PCs IP. So for example 192.168.10.24 if the Edge PC IP is 192.168.10.1Click Save. Congratulations! You have installed the United Manufacturing Hub!
If you want to continue right away with the configuration of Node-RED and Grafana, check out the Get Started section !
Troubleshooting
Problem: flatcar it is installed on the USB stick instead of the hard disk
Solution: The target disk must be specified correctly. When using our iPXE image, you should select a different hard disk type during installation (maybe heck the manual of the device first to prevent trying out all of the methods). When using a custom configuration file, check the configuration e.g., in matchbox.
Problem: the cluster can be accessed in UMHLens, but there are no pods
Solution: there was a problem during the UMH Helm chart installation. run sudo kubectl get po -n united-manufacturing-hub . If resources are found try restarting lens. if there are no resources found run systemctl status k3s . If k3s is running UMH is likely not installed. View logs systemctl status umh-install and systemctl status helm-install